
Cron Jobs work like an alarm clock, you set the timer to a set date and time, and when the alarm goes off, some command gets executed. Simple enough, right?
Cron jobs are the smartest and simplest way to automate things on a Linux server, however, its design, deeply rooted in the earliest code from the initial versions of the Linux kernel, designed by the deep minds that created Linux itself, doesn’t always present itself as obvious to us marketers, that’s probably why so many people have issues with cron jobs. Yes, maybe this is something that could be solved within the Mautic interface, maybe someday… in the meantime, let’s try to tackle this problem down.
What are Mautic cron jobs?
Technically speaking, there aren’t Mautic cron jobs per se, what we all use are Mautic commands or rather Symfony commands created for Mautic, that we happen to trigger using a cron job. A Mautic command is an action or series of actions found within the Mautic code, these commands can be triggered from any line of code within Mautic or via your own code, also directly on the Linux CLI console or, of course, be triggered with cron jobs.
Cron jobs are the main way to schedule tasks in Linux, it´s basically a list of tasks to be executed at certain times, so yes it´s kind of an alarm clock which instead of ringing, runs a command in the server when the time is right. You can set as many alarms as you want, and each one can trigger a different command.
What we call Mautic cron jobs are in fact Mautic commands run by the cron scheduler at predefined intervals.
If you are setting up the Mautic cron jobs for the first time or for some reason your Mautic cron jobs are not working, this post will help you get on your feet.
In order to be able to properly set the Mautic cron jobs for your specific server/hosting, there are 3 variables that you need to solve first, we will divide the problem into these 3 variables and in the end, we will wrap it all, let’s get started!
1st variable. The Mautic command:
This is the easiest one to solve, cause you can find the right answer everywhere, these are the basic commands that are needed to run Mautic:
- mautic:segments:update
- mautic:campaigns:update
- mautic:campaigns:trigger
For a full list of all the Mautic commands you can use as cronjobs, check this post: Mautic Cron Jobs, Which Ones to Use
2nd variable. The path:
Now, to be able to run these commands you need to tell ¨cron¨ where the scripts you want to run are, where it can find the Mautic commands in your server, here the thing gets more complicated because every OS has its own default path, every service provider will also add some extra folders (or not) and if you are using any sort of panel, well, no comment. But fear not!
Cause my good friend Robert Went gave me an idea, and we’ve both worked tirelessly to give you all a universal solution to this problem.
To successfully complete this project we had to work for literally thousands of… well, milliseconds. Here’s the code and when you run it, it will tell you your path and will give you an example that is very likely going to be your full cron command:
<?php echo ‘Your Path is: ‘;echo $_SERVER[‘DOCUMENT_ROOT’]; echo ‘/app/console’; echo ‘ and your cron jobs will PROBABLY be: * * * * * php ‘;echo $_SERVER[‘DOCUMENT_ROOT’]; echo ‘/app/console mautic:segments:update’; ?>
You can run this little script manually, for that you first need to create a new file on your server, you can do this within the Linux console by using the nano text editor, or you can create the file on your desktop and later upload it to your server.
Call the file “rootpath.php” (or whatever you want) and copy these 4 lines into it, then save it and upload it to your Mautic folder (using FTP for example).
To open the text editor with a new empty document use:
nano /var/www/html/rootpath.php
Now copy the 4 lines provided above and save by pressing “Ctrl + x” when asked (at the bottom) save your file as rootpath.php
Now open your web browser and point it to your Mautic installation, the proper URL to run this script is almost the same one you normally use to access your Mautic installation, but you will need to delete anything that you find after the domain name (probably “s/dashboard” or maybe “s/login”) and add “rootpath.php” after that.
The URL should look something like this http://mauticsubdomain.yourdomain.com/rootpath.php (if you installed Mautic on a subdomain)
or like this http://www.yourdomain.com/mauticfolder/rootpath.php (if you installed Mautic on a folder)
or just use the IP of your Mautic server: http://123.12.123.12/rootpath.php
When you reach this new PHP file you just created, it will automatically return the current path to the Mautic commands in your own server.
Take note of the path showing in your browser and then delete this file you’ve just created, we don’t want anyone else knowing about your server’s path…
3rd variable. The timing:
The timing is the last variable, or should I say the first? There are different ways to set this up but for simplicity sake, we’ll just use * * * * *
I’m not going to discuss the details about cron job timings in this post, I’ll write a new post soon explaining how to properly “time” your cron jobs, for now, you just need to know that * * * * * means every minute and that you need to add “PHP ” (notice the extra space after the last * and after PHP) so your server knows how to run the rest of the command.
Let’s put it all together!
We’ve done the work, and now it’s time to reap the rewards…
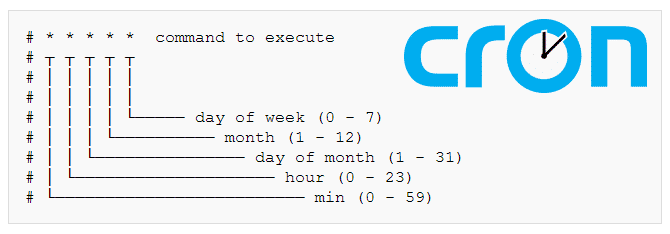
Every cron job is basically built with the same parts, your cron jobs will have 3 parts as shown below:
* * * * * php +Path +Command
The Path is what you got in the second step and the commands are the ones listed in the first step
so, let’s say you ran the script and your path was “/var/www/html/”
Then your cron jobs would be like this:
* * * * * php /var/www/html/app/console mautic:segments:update
* * * * * php /var/www/html/app/console mautic:campaigns:update
* * * * * php /var/www/html/app/console mautic:campaigns:trigger
Notice there are spaces before and after PHP and one more after console, you need to respect every space or you will get in trouble.
Install your cron jobs!
If you run Mautic on a VPS and logically have access to your server via ssh, you now can add these commands to your crontab, for that just log into your server via SSH and type:
sudo crontab -e
If this is the first time you edit your crontab it will ask you to choose an editor, (choose “nano” it’s probably the simplest one to get started with).
You can now write your commands on the editor, it doesn’t really matter where but you usually add new stuff at the end of the file.
If you are using some shared hosting or a control panel, you might not have direct access to your crontab, I can’t help you in this situation cause each provider and each panel has its own way of doing things, if that is the case, you will have to ask your service provider for instructions.
Hope this was instructive and remember you can ask questions in the comments here below if any of the steps don’t work as expected on your own setup.
My name is Yosu Cadilla, a Systems Analyst and Platform Engineer for mktg.dev
I discovered Mautic in 2017 and since have specialized in:
– Running Mautic for Marketing Agencies.
– Running large Mautic instances, sometimes with millions of contacts.
– Helping companies build and optimize their (usually Mautic) runtime infrastructure.
If you are planning on deploying Mautic for your Marketing Agency, or you have a large Mautic Instance…
Let’s have a chat! yosu.cadilla@gmail.com


I like this post, enjoyed this one thanks for putting up.
I like this post, enjoyed this one thanks for putting up.
Pingback: Mautic cron jobs: Which ones to use? – mauteam.org
Pingback: Install Mautic Plugin – Mixin for dummies & marketers too – mauteam.org
Pingback: Mautic Installation in 3 Simple Steps on a VPS – mauteam.org
Comments are closed.